Friday, August 15, 2014

Cute Owl Frame


Hey Friends,
 
Who doesn't love Home Décor?  This frame is simply adorable.  Would be so stinking cute in a little girls room or even a Shower Gift for an expectant mother.  Neither of which I have.  lol  
I enjoyed making this frame non-the-less. 
I suppose I could maybe send it to one of my nieces?  We will see...
Little details: 
1.  The feathers were made from a circle scalloped punch. 
2.  The owl pattern was drawn out and cut with scissors. 
3.  I inked around the edges to soften it up a bit. 
4.  Used buttons as the eyes. 
5.  The frame is a 8 x 8 frame from Michaels and I used paper inside. 
6.  I sewn around the grey mat to add a little more detail to the framed picture. 
7.  The owl was adhered using foam dots for the depth.
Thanks for stopping by today!  Hope you have a great week-end.
 
signature

Wednesday, August 13, 2014

Merry & Bright Layout

 Hey Friends,
 
Woo HOO!  It's Wednesday!  
 
For Christmas, I usually do a Mini Album to document the Holiday Season, but this year I didn't follow through.  Which means, I don't have that many pictures to complete a mini album and no where to put the cards I have received.  When I receive a card from family & friend during the Holidays, I always keep them.  I never throw them away.  I decided I wanted to create another page to go on the other side of the layout I showed you on Monday 8/11/2014.  A bonus is that all the makings of the last layout is still on my desk- so I just put it together.   
 
This page is using the same paper line and embellishments that I used in my Monday's layout.  All are from Heidi Swapp's Christmas line for 2013 & some Martha Stewart embellishments. 
 
This layout only has 3 pictures on it.  I have more pictures & cards that are from Friends and I am not sure how I want to do them in my album.  Once I decide, I'll be sure to show you here - on the blog. 
 
Thanks for stopping by today. 

signature

Monday, August 11, 2014

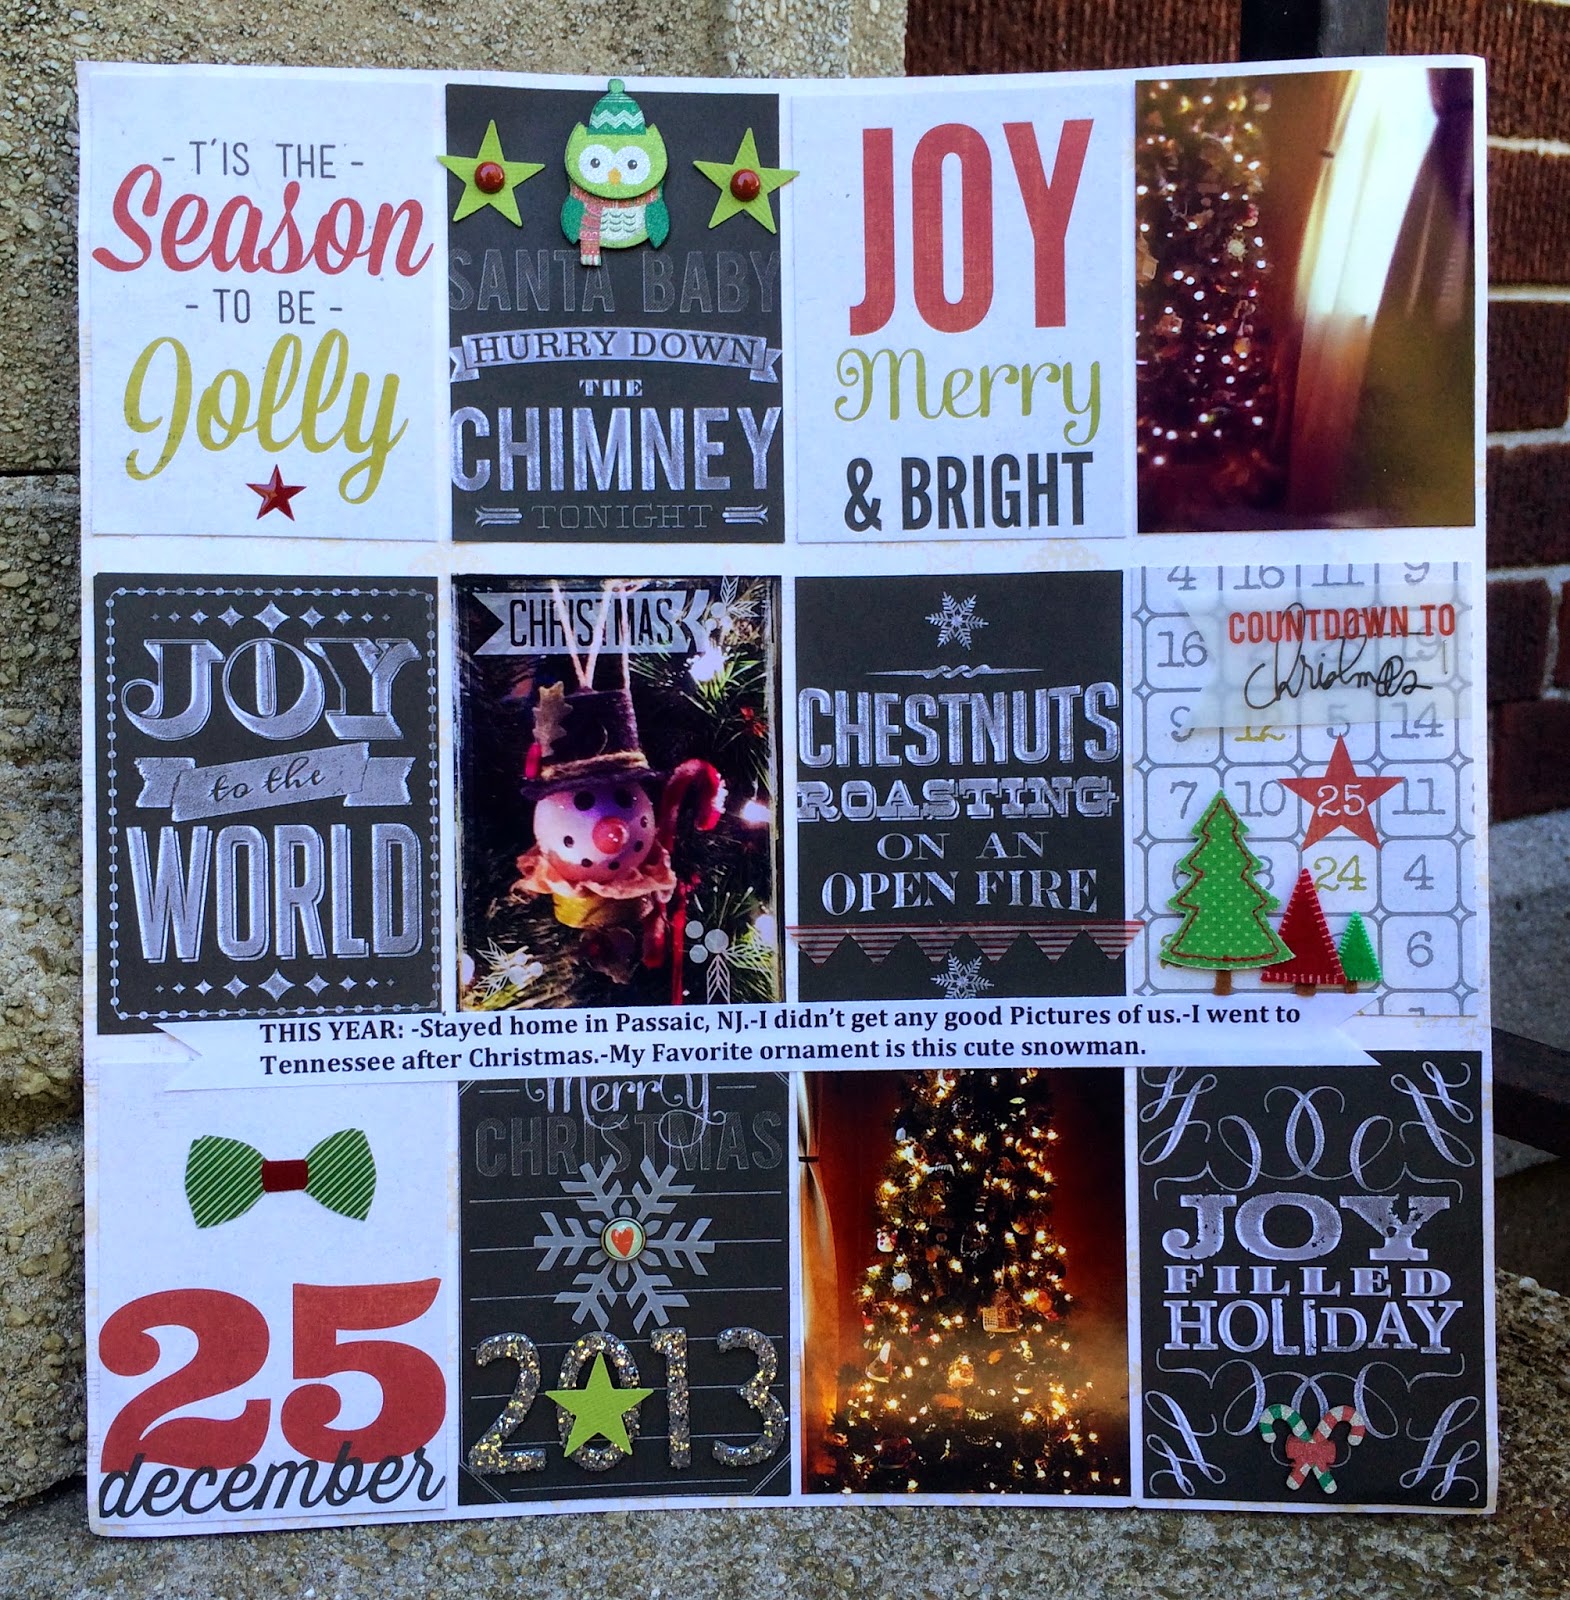
Christmas 2013 Layout

Hey There Friends,
I was able to finally carve out some time to make a scrapbook page for my Christmas album.  A few years ago I purchased an album that I have designated just for the Holiday.  My Christmas Album is a Creative Memories original style album (not the true fit) and it is just like the one pictured below.  Since Creative Memories has closed its doors and is no longer making products, I went ahead and purchased another one (different style) just so I can have it on hand for when I fill this one up.  I am a creature of habit and want my Christmas Albums to look alike is size.
Every year I try to get one picture of the hubby & I on Christmas and create a page with that one picture.  Sometimes I have 2 or 3.  As for this year I didn't get even one picture of us.  Shame on me
 
Being that I didn't get a picture of us- I had to improvise and use what I had.  I couldn't NOT do a page for this year.  So...  Since living in NJ and living in our very small apartment for the past 8 years we have only had room for a small tree.  So excited that 2013 I was able to get a nice & somewhat narrow 7 foot tree...  It is artificial but I love it.  So my page is a focus of the tree & my favorite ornament for this year.
For this page I used Heidi Swapp's Christmas Collection for last year.  Since the Project Life craze-I wanted to use the cut out page of the 3 x 4 cards and use it on a regular card stock in the format of Project Life without using Project Life page protectors.  And I needed to make the page fit my Old Traditional Size Creative Memories pages.  After everything was cut & layered I added some embellishments through out the page to get your eye to follow the page.   The sentiment was typed up on my computer, printed and adhered to the center of the page.  Some of the embellishments used were from Martha Stewarts Christmas line.  I am not sure the year or the name of the collection it came from though.  Sorry.
 
FYI: For my Creative Memories Albums I do not work directly out of the book or directly on the page.  I do a separate page then adhere it onto the page itself once I am sure this is the place I want it to be.  Since it is a little difficult to just change the pages up. 
 
This layout is ready to be added to my book.  It is only 8 months after Christmas.. but I am ok with it just being done.  (Smile)
 
Thanks for stopping by today.


Friday, August 8, 2014

Thank You Card

Hi Friends,
 
Happy Friday!  Hope you all have a nice relaxing day to welcome your week-end. 
 
Today I am sharing with you a Thank You card that I made.  I don't normally send out Thank You cards- but I love how this one turned out.  The card is so bright and fun.  You could simply change up the sentiment with any that you choose. 
I have step by step instructions on how to create these below.
 
 
What You Need: 
Color Basics 12 x 12 Paper Pad 30-613409 EK Success
Accent Frame Punch 54-30084 EK Success
Inkadinkado Wood Stamp, Thank You, 60-00273           
Inkadinkado Clear Stamp, Gem Stone Flowers 98980
Clear Extra Large Block LM801611 EK Success
ZIG 2-way Glue pen EA873820 EK Success
3-D Dots-White Adhesive Foam 1/8 inch Squares EA873808 EK Success
Paper Cutter
Scissors
A6 White Card LV837509
Embossing Powder Clear 
Glitter Pearlescent chunky glitter 
White Cardstock for stamping
Acetate
3 gem stones (for the flower centers)
Black, Orange, Pink, Blue & Brown Ink pad        
Brown Ink
Embossing Heat Gun
VersaMark Ink Pad
Tools: Sewing Machine (optional)
 
What To Do:
1.     Stamp flower image from the clear stamp on the white cardstock base with the embossing ink pad.  Pour the embossing powder onto the stamped images and heat set with the embossing heat gun.
2.     Cut eight strips of paper from the paper pad in to various widths and lengths: ¼ inch x 4 ¼ inch, ½ inch x 4 inches, ¼ inch x 3 ¾ inches
3.     Glue each strip down to the bottom of the card base.  Layering on top of each other.
4.     Optional:  Sew two vertical lines on the left of the card and one horizontal crossing the vertical lines.
5.     Punch out 2 Accent Frames from white cardstock.  Cut the acetate down to slightly bigger than the center of the Accent Frame.  Glue the 2 Accent Frames together with the Acetate in the center, creating a window.
6.     Glue glitter on top of the Accent Frame with the 2 way glue pen.
7.     Stamp “Thank You” onto white cardstock with black ink.  Cut the Thank you apart to create two pieces. Ink around the edges with blue ink.
8.     Stamp the flower four times, once with each color Blue, Orange, and Green.  Then Twice with Pink.  TIP:  For a Two Tone effect: sponge ink around the edges with one color then in the center with another.
9.     Cut each flower out except the green one.  The green if for the leaves. 
10.  Glue down the frame to the top center of the pattern paper you glued down already.
11.  Layer the flowers around the frame.  Use the foam dots to get more dimensions.
12.  Glue Gem stones into the center of the flowers.  Tuck one of the leaves under each of the flowers.
13.  Glue down with foam dots the “Thank” and “you” onto your card.

Thanks for stopping by today! 

signature

Monday, August 4, 2014

Comments on Blog Posts

Hi Friends,

I had to turn on the "Word Verification" on my blog comments.  The reason is that I have been getting quite a few spam comments and the first step to take care of this for a while is to turn on the "word Verification".  If it doesn't help then I'll moderate the messages for a little while.

I do go through and delete some messages due to the "spam" comments.

This will not be a permanent thing. Just something to hopefully detour the automatic computer comments that pop up every now and again.

Sorry for the extra step to comment on a blog post.
signature

Friday, August 1, 2014

Thank You Tag

 
Happy Friday!
 
Today I am here to share with you another Tag I made. 
 
For this tag I used one of my Manila Tags that I stained with "Tea" to make it vintage looking.  I then used an embellishment pack from a K & Company Tim Coffey Line and pulled out this one piece that was pretty big and cut it down to use it as Pattern Paper.  I ruffed up the edges with scissors and then inked around the edges with some distress ink.  With my sewing machine, I sewed around the edges of the pattern paper. 
 
From the same embellishment pack, I pulled out the lady bugs & the flower and adhered those to the tag.  I used a stamp from Inkadinkado stamp to stamp the "Thank You".  I cut out the thank you with scissors and cut fish tails out of each end.  With my brown distress ink, I inked the edges of the "Thank You". 
 
This tag will be cute on a gift for a special friend or anyone.  
 
Thanks so much for stopping by! 
signature