This post is sharing with you cards I made using very minimal supplies. I just love making cards like this. Distress Oxide Spray to the rescue when you want something a little artsy and splashy.
To achieve the spashy background, I put a 4 1/4 x 5 1/2 piece of watercolor paper on a junk blank notebook and sprayed away. I then used my heat tool to dry the spray. Each card is different as you can't control where the sprays go. I currently only have these 4 colors of distress Oxide sprays-and thought why not use them all. :) As always - the first one is my practice run so that I can get a feel of how the bottle sprays.
There you have it, another card in the books and already in the mail to friends.
Yes!! It's me! I know, I know it has been a while since I have posted.
This time-I have an excuse for my absence: His name is Jaxon and he will be 4 months in 2 days.
Since having baby Jaxon, I've had a hard time finding who I am. I decided to join in the 'Card Pals' card exchange from Paper Anthology in New Jersey. I needed a little something to help get me get creative and active again and this was the push I needed.
This is the card I made to send out to my July Card Pal and it is officially in the mail to her.
Card making is my first 'Crafty Joy' and I am pretty happy to be making cards again. My goal is to make cards and to actually MAIL the cards. With this design, I made 6 cards and mailed out 6 cards.
How cute is this stamp set by Everyday Explorers Co, it adds the perfect touch to my envelopes.
I hope that you are doing well through this pandemic and staying safe.
When I saw these coffins in the Stampin Up mini catalog this year, I just knew I had to have it! And So I did. For this Wicked Wednesday Catch Post I am showcasing these treat holders.
They were super easy to put together with a little bit of glue. The only thing I really wish is that there wa an actual die for the coffin. In the video below I will show you how I put them together.
Hey There! Who doesn't love Chocolate? If you are like me, when I purchase candy for friends-I have to make sure that it is candy I don't like, so I don't eat it. lol In this catch up post, I am showing my favorite way to give sweet candy gifts. My Favorite Things didn't disappoint with these cute nugget holders.
These are the items you will need to complete 1 of the Nugget Pouch Tag is pictured below.
In the video below I show you how I put them together. It really is super easy. Once you make one, you will keep making them over and over.
This one is Wicked Wednesday #2 and I made a spooktacular library pocket.
I had these authentic library pockets in my stash but I just couldn't make it work- I decided I really need to just make my own. This was fairly simple to put together and I showed you a process on my youtube video below.
These can hold anything from Seed Packets but I had Pop Rocks in my possession and figured they would work perfectly.
Thanks so much for stopping by and Happy Crafting!
Happy Friday- Lets get cozy or Smashed with a hot cup of Tea. Spiked or whatever, No judgement here. :) I'll take mine strait up.
Before I get started on Wicked Wednesday #3- HOW cute is this pumpkin?
This was a fun one to make. I made quite a few of them to share with friends over the Halloween season. Here is a video on how I put these holders together.
They look so cute all staggered and stacked together. The seam binding holds them together and makes a sweet little bow.
One of my most favorite things to do is stamp on Muslin. I use an archival based ink (in this case I used Extreme Black by MFT) and it just adds texture to whatever you are making. I like to rip my fabric so it give it a nice edging.
Another thing I love to do is using my sewing machine on my projects. My Sewing isn't perfect, but it add a little extra to the finished look.
Thank you so much for stopping by and Happy Crafting!!
Wow October Flew by.
I can't believe it is November already and almost Thanksgiving. Don't bake those Pies or Turkeys yet, I have some catching up to do with some Halloween goodness to share with you over the next few posts.
I was in a Crafty funk for a while and in September- and I decided enough was enough and needed to get myself out of it. Let's face it, I love to craft and I have the stuff and the stuff needs to get used. So that being said, Wicked Wednesday was created.
Wicked Wednesday #1 showcased some Adorable Creepy fabric by Basic Grey and with some stitching it created this Wickedly Cute Pouch.
I love making these pouches for friends. You can fill with anything. Just treat it like a Goody Bag and you're all set. For the video below, I just filled with Single Mug Brownie Mix and Halloween Candy.
These pouches are so cute and so versatile you can make them using any fabric for any occasion.
Disclaimer: you may see these again in the future for a different occasion. :)
Hi There! It is time for another episode of Eclectic Stash Busting Challenge. For this year our goal is to use stuff we have and finish things we have been wanting to finish or do. This month is no exception- I decided to finish up this Samsonite Train case I got from a sweet friend. I have had it for a while now and decided now is the time. Using Mod Podge, Foam Brushes and Paper this turned out so cute. Now to complete the inside as it needs a little help.
I plan to do this again on another travel case. Thank you for stopping by and take a look at these photos below. Anna
Hey There! Welcome back to my blog. Today we are going to PLAY with Cricut-Infusible Ink Transfers! This wonderful new product was released on June 21st at your favorite Michaels store. I was tempted to purchase this online but decided I wanted more of an 'instant gratification' and went into my local Michaels and picked up a couple of must haves. What is Cricuts Infusible Ink? It is an Ink system that delivers seamlessly smooth, professional-quality transfers that become one with your material. And this can be done right at home. What that means is that it does not sit on top of your substrate like vinyl or iron-on- it actually infuses into the substrate. Today we are going to make an adorable Mermaid baby Onesie using some designs off of Cricut Design Space. You can find more information on it here: CRICUT I made a 'UNprofessional' video of the baby onesie. No judging-lol but I wanted to share with you what I got and what I made.
Cricut Infusible Ink is only exclusive to Michaels until October 1st. For now you can purchase your supplies today at: Michaels
I plan to make more items using the infusible inks.
Here is my Eclectic Stash Busting Video. For the month of June we decided to do Vintage Hankies. I just love to buy vintage hankies at estate sales or Garage Sales. They have so many stories and some are just beautiful with lots of pattern or a nice little embroidery. You can view the video below.
These were so much fun to make and I can't wait to share them with some friends.
Hi Friends, Happy Friday! Today I am going to share with you a card I made using a fun stamp set called "Beautiful Ride' by Stampin' Up!
I used my Color Burst powders designed by Ken Oliver. I love how once you add the water the colors just literally 'burst'. There are so many options. I can't wait to try more color combinations.
Hi Friends, I am happy to share with you a "Flip-Book" that I have made. This flip-book is currently on its journey to a sweet friend. This is not a "pen-pal" type flip-book, it is filled with some goodies that I wanted to share with her.
I used some Tilda Papers, Mother of Pearl Buttons, and some Sari Ribbon that I purchased from Ebay. I used one sheet of paper and scored to create each panel. Another way you could make this, is by using different papers and then putting them together with washi tape.
After you untie the Sari Ribbon and open the first flap this is what you see. The right has some vintage laces and trims wrapped around a Tea/Coffee Stain tag. and on the left you see a glassine bag filled with Tilda die cuts. The glassine bag is adhered to the page with washi. On the front of the glassine bag is a cut out and I hot glued Mother of Pearl buttons on the space where there were buttons.
After you open the right flap, you will see this.
I have added a few more little pages inside, and when you open each one, it unveils different Vintage Findings.
All of these vintage items, I picked up at an estate sale. Thanks for stopping by. Hope you enjoyed my first 'Flip-book'.
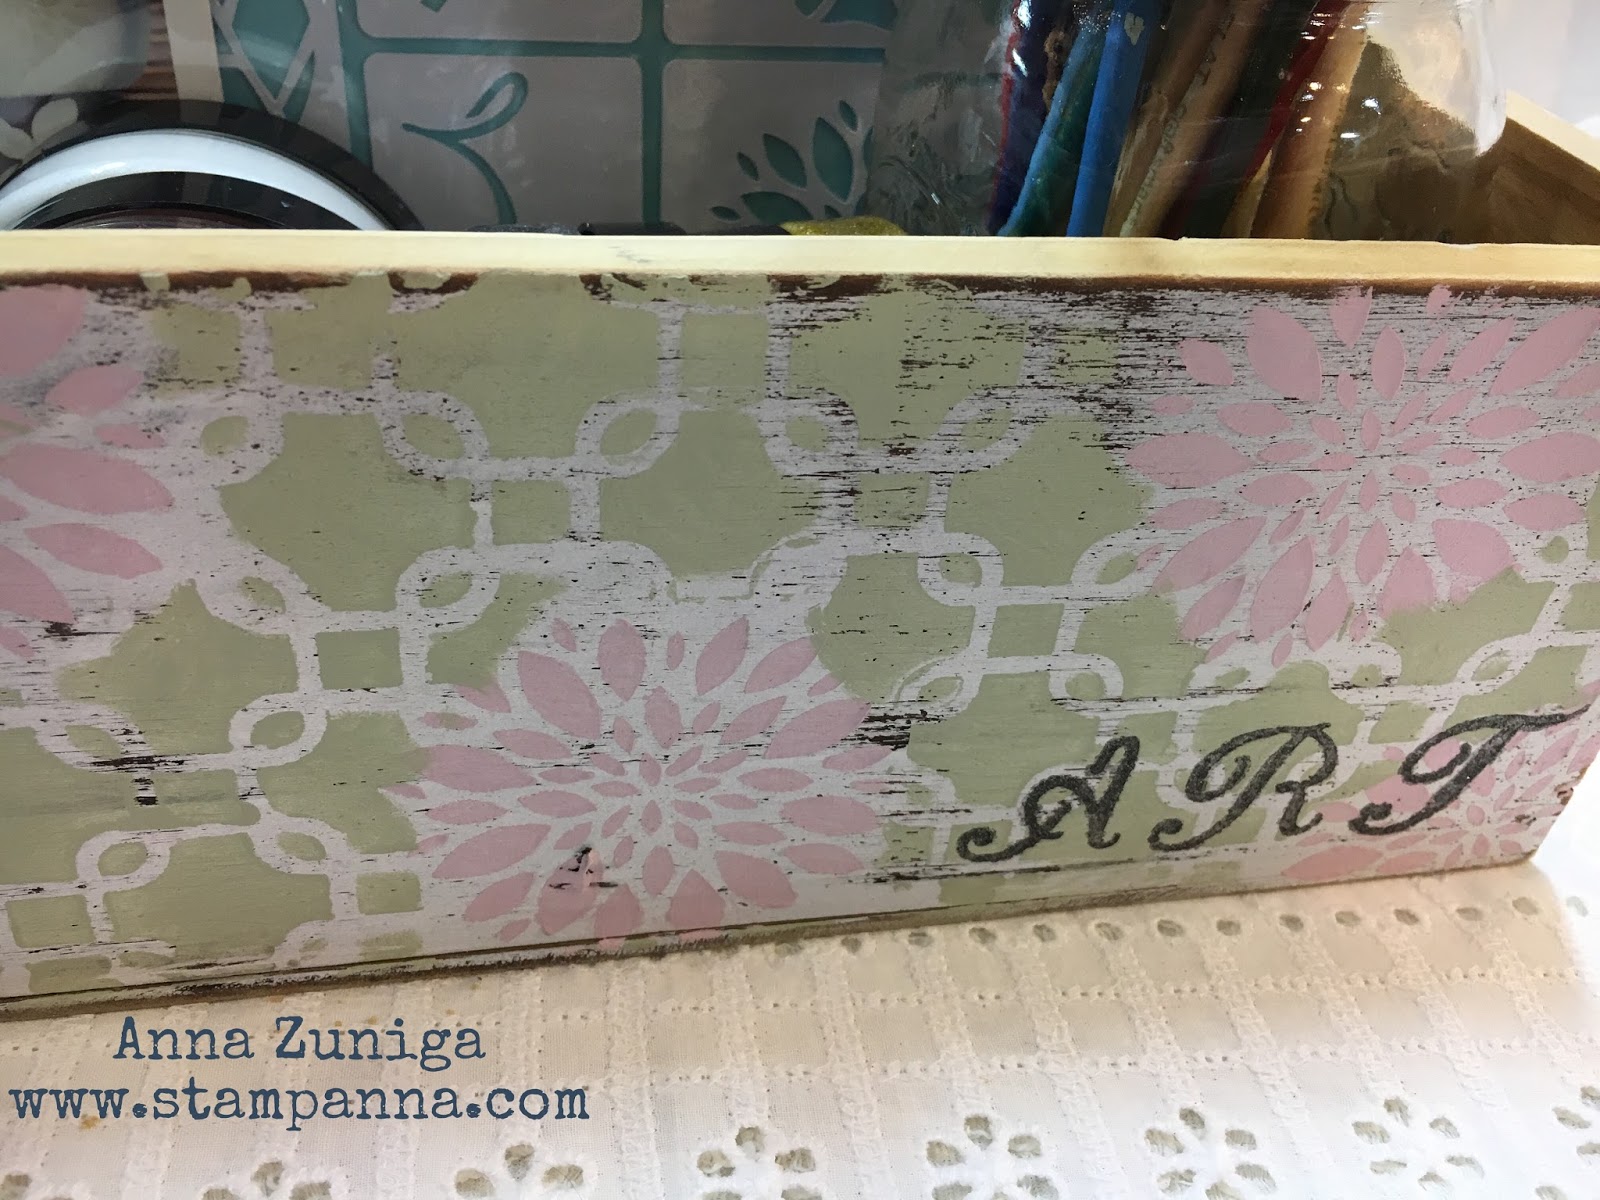
Today's post isn't about what I sent to CHA for the Momenta/Art-C booth. Today's project features "NEW PRODUCT" that was Debuted at the Winter CHA show in Anaheim, California. I picked up this cute distressed box at a big box store and thought it would be so cute stenciled up. So here we go. I am showing you a step by step of what I did to create this cute box. INSTRUCTIONS: Step 1:Gather your supplies. I wasn't sure what color I wanted to do so I gathered all the 2016 new release product that I had so I can use them on this project.
Step 2:I decided to go with the Country Pink Ultra Matte Chalk Paint and the flower stencil from the set "Flowers and Bugs Adhesive Stencil". I put some paint on my non stick mat and used my 'groove tool' and the small brush to add the paint to my project. The small brush is perfect for the small areas. I added all around the box.
Step 3:After the pink flowers have dried completely. I placed my large stencil on the area to the left of the box first. I used Country Green Ultra Matte Chalk Paint and the brush applicator to the groove tool and only added the Country Green paint to the area where the pink flowers were not. I then- picked up my stencil and moved it over, carefully aligning it up with the lattice template already painted on-Then I finished adding the Country Green paint over to the right of the box. I only did this for the front and back of the box and not the sides.
This is what it will look like when you are done.
Step 4:After the Country Green paint has dried completely I added letters from the 'Alphabet Adhesive Stencil' to say 'ART'. I placed the letters on the bottom right of the box.
Step 5:I used Steel Luxe Paint and my Groove Tool with the small brush attacher to add paint to the letters. I love the stainless steel look.
Step 6: After the paint has dried, add your art supplies to the box.
Thank you for stopping by. Hope you have a great day!