Saturday, October 27, 2012

Un"Boo"lievable Blog Hop

Hi Everyone,

Welcome to the "Un"Boo"lievable Blog Hop".  There are a lot of spooktacular projects in this hop. 

If you have arrived from Suzy's Crafts then your in the right spot.  If you didn't start at the beginning of the hop you may want to start from the beginning as I am sure you don't want to miss out on some fabulous projects and prizes along the way.  The beginning is Lisa's Blog.  

For my project I made a card using a stamp I purchased at Michaels.  


Isn't she cute?  I colored her in with my copic markers.  I really love how she turned out.  

Thanks so much for stopping by my blog today.  The next stop on the hop is:  Liz's Blog.

Have a great day!  ;)

Friday, October 12, 2012

Melisa's Blog-a-versary Blog Hop

Hi Everyone,  I am so happy to be apart of Melisa's Blog-a-Versary!  She is such a sweet heart and I am so honored that she asked me to be apart of her celebration.

If you haven't started at the beginning you may want to skip on over to Melisa's Blog: Melisa's Crafty Creations.  There are going to be give-a-ways along the way- Be sure to leave a comment on each blog to be eligible to win.

If you hopped on over from Melisa's Blog:  Melisa's Crafty Creations then your in the right spot.

The Theme for Melisa's Blog-a-versary Blog Hop is Fall/Halloween.  I chose to do some Halloween Projects.

First up is a jar I whipped up with some Hershey Kisses.
 I spray painted the lid black to work with my "Halloween" theme.  The jar is filled with Hershey Kisses.

On the bottom of each kiss is an epoxy sticker that was made by K & Co.  I purchased these at JoAnn's when they had K & Co on sale for 40% off a few weeks back.  I was excited when I seen that they look so cute on the Kisses.  Added a Graphic 45 Chipboard tag to the Seam Binding Ribbon and then wrapped some pom pom ribbon around the lid.  Now I have a cute little jar I can give away to a friend.

My 2nd and final project is this cute card.  This is a stamp set I picked up at Michael's and colored it in with my copic markers.  Added some pattern paper and ribbon and this little guy turned out so stinking cute.

 Thanks so much for stopping by today.  :)  Your next stop is:  ANNETTE.

Just in case you get lost along the way here is the complete listing of the blog hop.


YOU ARE HERE Anna YOU ARE HERE


Thursday, October 11, 2012

Hi Everyone,  I have a friend who is celebrating her 
Blog-aversary tomorrow.  I am in the line up for the blog hop, so be sure to check back tomorrow!!!  :)


Saturday, October 6, 2012

World Card making Day

Hi Everyone,

Happy World Card Making Day!  :)  

What are you making?  Anything "Crafty"?  

I have a few projects I am showing you today.  :) I hope you enjoy..

First up is a card I made recently using a stamp I got for my birthday from a Sweet Friend in Florida. :)  I love it.  I even had more fun coloring it in with my copic markers.  I love the Haunted House and how spooky it is.    


Today I was going through my computer and cleaning up my picture file section of my computer and came across quite a few cards I have done in the past.  I figured since it was World Card Making Day I would show you a few.  Maybe you seen them, maybe you haven't.  :)  So here goes....  Have a great day everyone!!!  :)


Friday, September 28, 2012

Check this out!!!

Hi Everyone,

Today I am going to share with you another blog.  Her name is Anna and she does some pretty awesome scrapbooking.  Not to mention that she has used some of my seam binding ribbon on her pages.  Check ANNA out over at her blog by CLICKING HERE.


Be sure to check out her blog.  It is now in my faves!  :)  You can find my seam binding ribbon by going to my etsy store:  SEAM BINDING RIBBON

Thanks so much for stopping by today!

Tuesday, September 25, 2012

Jeepers Creepers

Hi Everyone,

Last night I had such a migraine that I went home had some dinner and went to bed all before 6pm.   I slept until 11pm.  Thank goodness the headache was gone but I couldn't sleep after that.  

I can't wait to get off work today.  My plans are to go home and work on some scrapping for hire work I have to do.  What are y our plans for today?  Anything Creative?  

Today I am showing you a card I made using the Papertrey Ink spiderweb die.  I added Black glass glitter to the web to make it sparkly.  :)  By the way,  Have I told you that I love GLASS GLITTER.  Oh my that stuff is addicting.  lol  So addicting I added the green glass glitter to the spider.  How cute is he?  lol  He was cut out using my Cameo.  


The sentiment came from Pink by Design called "A Haunting We Will Go".  It can be found by CLICKING HERE.

The pattern paper is by Stampin' Up.

Thanks for stopping by today.

Monday, September 24, 2012

Hi Everyone~

Today, I got up and put on long sleeves for work today.  :)  I love the crispness of the mornings, it means Fall is here.  YAY!  

The Mr and I went apple picking this past Saturday.  Got lots of apples, 1/2 gal of apple cider & some apple donuts.  

Today I am sharing a card I made over at my friends house last week.  I used my Honey Comb Die from Paper Trey Ink with the coordinating stamp set.


My friend, Iman, Pulled out this paper and I was challenged to use it.  :)  I do like how it turned out and am sure I'll be using it.  :)

The ribbon can be found in my etsy store:  CLICK HERE

Thanks so much for stopping by.
Anna

Tuesday, September 18, 2012

Good Morning!

Hi Everyone,

I am not sure about you, but I had a difficult time getting up this morning.  This usually happens when I get up early when hubby gets up and I have a hard time falling back to sleep, that when I finally do fall asleep I have a difficult time getting up.  

Oh Well.  I made it to work, so that is a bonus.  {SMILE}

I am sharing a card with you that I finished up over the week end.  The paper is by Cosmo Cricket- Social Club & the stamp is from Outlines.  (who is no longer in business)

This is an oldie but a goodie card.  I actually created it back in May of 2011.  I had some extra kits from the Stamp Club that I used to teach at the LSS.  I figured I might as well use them right?  I already had the base and the layering part already done so I just had to finish up with the coloring with my copic markers.

Instead of doing this card landscape like I did the last time I decided to go portrait.  Then, instead of using the red satin ribbon I decided to use my Tea Stained Seam Binding Ribbon.  (can be found here:  in my ETSY SHOP.

Thanks for stopping by today.

Monday, September 17, 2012

The Creative Adult

Hi Everyone,

Hope you all had a great week end.  The boss is out golfing today and I have quite a bit of work to do.  

I wanted to share with you a card I made for my Pink by Design blog post I posted on Thursday.  

I used a set that came with our Monthly Stamp club set.  How cool is that.  Free is always good right?  I love that Pink by Design is so giving to their customers.  

As of right now this set is not available for purchase.  This is called "Love 2 Create".  You can find out more on the Stamp of the month by CLICKING HERE.


Thank you for stopping by today.  :)  

Wednesday, September 12, 2012

Feel Better Soon

Hi Everyone,

Happy Hump Day, 

Today I am going to share with you a card I made.  I dusted off my Cameo again for this project.  

Lisa has some cute cute stuff in her store from Digital images and SVG files for you to cut out with your Silhouette/Cameo or your Electric Die cut Machine.  Check them out here:  PRETTY PAPER GRAPHICS


I did this card using her GET WELL CUTTING FILE.  I sewn on a pocket on the front of the card and added a tea bag into the pocket. I chose a sentiment from Paper Smooches HEALTHY VIBES stamp set. 

Thanks for stopping by today.  


Tuesday, September 11, 2012

Adore


Hi Everyone,

Here is another tid-bit about me.  :)  I love all things shabby, vintage and collage'y.  

I created this card last week.  I used a just a bunch of odds and ends that were in a drawer.  I pulled it out and put it on the table and decided I was going to use it.  I really do love how it turned out.  


I used a wax bag on the front of the card to create a pocket for the tag.  

Thanks for stopping by today.  Be sure to check back tomorrow as I have some exciting news to share.  :)


Monday, September 10, 2012

Owl Frame-Ink it Pink Challenge 12

Hi Everyone,  

Welcome to a new week!  

It is beginning to look like Fall here in NJ.  If you have followed my blog for a while then you know that this is my most favorite time of year.  I can't wait to go apple picking.  Pumpkin Picking.  The decorating.  :)  Oh my goodness.  I get so excited.  lol  

Have you seen the Pink by Design Challenge?  Check it out HERE!

The Challenge is "Birds".  :)  I chose this cute little file from the Silhouette store.


I used some of my Tea Stained Seam Binding Ribbon that you can find here to wrap around the frame.  The Tea Stained tag is also in my shop and can be found here.  The sentiment on the Tag came from the Stamp of the month called "Illuminate" made by PINK BY DESIGN

Fall color ribbon is coming to the shop here in the next few days.  So stay tuned!  :)  

Wednesday, September 5, 2012

Be as BRIGHT as.....

Hi Everyone,

Yesterday was the first day back to work since my STAY-CATION.  I didn't get as much done as I had hoped last week while I was at home.  But I did just stay home.  Which was the #1 "to do" on the list.  

Don't forget about the Give-a-Way over at Jill's Blog :  Blessed Scrapper  CLICK HERE.

I got the new August Stamp-of-the Month from Pink by Design while I was home last week.  :)  It made for some happy mail, that's for sure!  The set is called Illuminate.  
I fell in love with this set right away.  I immediately went to my Cameo and found a light bulb file that I could cut out.  Then it hit me...  Why not make it in to a shaped card?  :) yes,  that is what I'll do.  I will make a shaped light-bulb card.  Here is what it looks like.  What do you think?  
I took some scattered straw and some wild honey distress inks and inked around the edges of my yellow light bulb.

Then on the bottom of the bulb (the part that you screw into the fixture) I used a post it note on the bottom of the card and the top of the part you screw into the fixture to mask it off to leave only the part I wanted silver.  I used my versa-mark ink pad and inked over that part really well.  (It is ok to get it onto the sticky note.)  Then I poured my silver embossing powder onto the inked part and heat set with my heat gun.

The very tip of bottom of the bulb was rounded, so I just cut it to make it flat.  (At least that is how I think the bulbs really are in real life.)

I glued all my parts together.  (which was only 3 parts: the base of the card, the yellow bulb, and the black in-parts.)

Now the hard part....  What sentiment do I want to use.  :)  I really like the one that says "Be as BRIGHT as you can be" (on the bottom left of the set) and decided it was perfect in size for just above the prong things.  I didn't want my sentiment to be black.  I came to the conclusion that it should be silver like the bottom of the bulb.  So I stamped with versa-mark then poured my silver embossing powder onto the sentiment and heat set with my heat tool.

I hope you like my card I made today.  Thanks for stopping by.

Tuesday, September 4, 2012

Seam Binding, Ideas & a Give-A-Way!!

Hi Everyone!

I want to share with you something I have been working on for quite a while now.  I have this fascination for all things vintage and shabby.  I have had this in my home office for, well...  Lets just say A WHILE.  :)  (even-though it has been longer than just "a while". lol)  When I say "This" i mean Seam Binding Ribbon and Tea Stained Tags/Ribbon.  I love love it.  Seam binding is perfect for adding onto a tag, a gift package, a card, a scrapbook page or even an altered art project.


Be sure to check all the way below as I have some projects posted using some of the seam binding.   

Here are a few items I have in my Etsy Shop.


 I tea stained these little guys myself and let them sit overnight to dry.  I really love the tags and the ribbon.  They came out beautiful! I think these are my favorite in the whole shop.  The above bundle comes with the following for $4.99.

  • (4) Large Tags 2 3/8" wide x 4 7/8" Tall
  • (4) Medium Tags 1 3/8" wide x 2 1/2" Tall
  • (5) Extra Small Tags 3/4" wide x 1" Tall
  • (1) Tea Stained Seam Binding Ribbon little over 1 yard.

The above Shabby Chic~Tea Stained Seam Binding ribbon comes in 10 yards for $4.99.  

 Next up is my Seam binding Ribbon.  These are all made by me and my dear friend who helped when I had to go to work.  :)  (Thank you B)
 These bundled Seam Binding ribbon are 5 yards of each 3 colors~Totaling 15 Yards~ All for $4.99 each That's only $.33 a yard.
 Check out that colors above.  I love the Purple, Orange and Green for Halloween.  So Much Fun!  It actually is a deep purple, like an Eggplant color.  (I am not sure why it shows up blue) (I took many pictures and it still looks blue to me.)
 The above is the Spring & Summer collection.  The Brightness of the Pink, Yellow and Lilac.  So Beautiful!

And this one.  Oh my.  Think of all the Christmas Projects you can do with this.  The 2 colors are 5 Yards each.  Totally up to 10 Yards for ONLY $3.50.

We have a give-a-way going on right now.  Head on over to Jill Cornell's blog "Blessed Scrapper" and check out some beautiful projects she made with my ribbon.  :)  Don't forget to leave a comment because one lucky winner will receive a $15 Gift Certificate to MY SHOP.

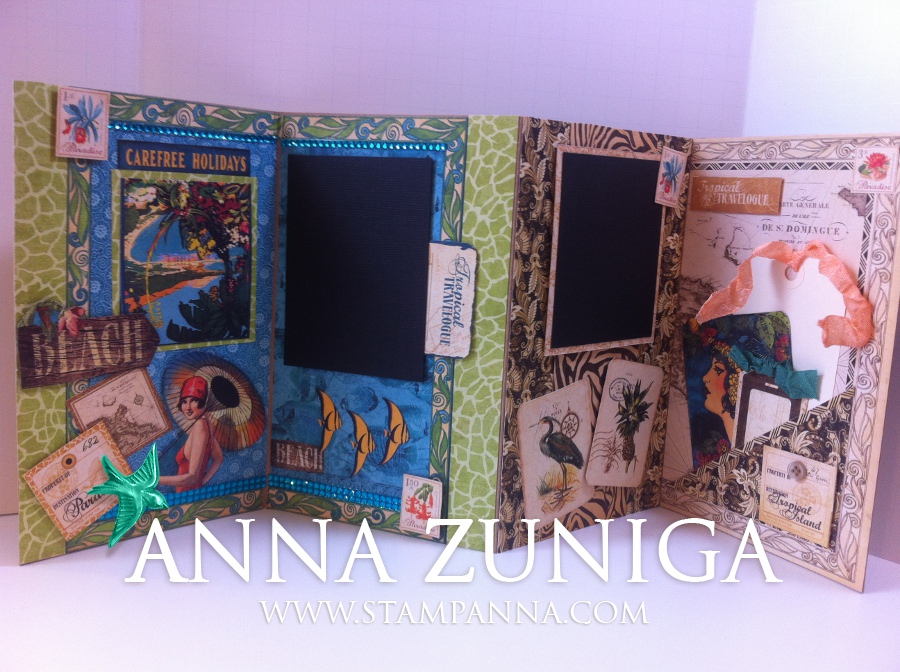
Here are some projects I have made in the past that use Shabby Chic Seam Binding Ribbon.  These have been posted on here at one time or another.  :)  I hope that this gives you some ideas on how to use the seam binding in your projects.


Thanks so much for stopping by today!

Friday, August 31, 2012

Hello Week-End...

Hi Everyone,  What's your plans for the long week end?  I have been off work since I left work at 2:30 on Tuesday.  Yay Me.  I have enjoyed staying home this week.  I got up when I wanted, went to bed when I wanted.  And, if I wanted a nap... Well, you guessed it.  I took one.  lol  

I did manage to mark a few things off my list.  I am hoping I can mark a few more this week end.  

Yesterday was my day to post over at the Pink by Design blog. And I made this cute card.  The stamps are little $1 stamps from Michael's.  The Sentiment is from Pink by Designs "A Haunting we will go".   I colored my images in with my copics and then cut them out to pop up off the card.

One of my projects I did was a little more organizing in my Scrap-Room.  If you are a crafter, stamper, or even a scrapper, you know this is an ongoing process.  I did pull out all my Halloween/Fall Stamps and put them in a basket.  These are what I want to use in the next few weeks.  I even got my Paper Trey Ink order in so I can use some of those cuteness's of stamps.  

I also got some "Pink" mail today.  I already made a card with it.  Can't wait to show you.  SOON.

Thanks for stopping  by today.

Monday, August 27, 2012

Happy Halloween- Paper Smooches Style

Yay for Monday!  

I am off work today, so that is why I can say "Yay for Monday".  :)  This whole week was suppose to be my "Stay-cation" week.  Then last week my boss asked me if I could work on Tuesday.  Please keep him in your prayers if you are the praying type.  He is going in for a biopsy tomorrow.  But for the remainder of the week I will be HOME.  

This week I want to relax, work on a few projects and organize some things around the house.  

Today I am sharing a card I made.  This one is using Paper Smooches Stamp set called "Halloweenies".    


I stamped the image with momento ink and colored it in with my copic markers.  After I was done coloring, I cut little frankie out and pop dotted him up off the page.  I added the stars and bats with a cute sentiment on the bottom.  All these are included in the "Halloweenies" stamp set.  

This card is a "almost" single layer card.  :)  

Thank you for stopping by today. 

Friday, August 24, 2012

G45 Tropical Paradise Mini Album w/ Box

Hi Everyone,  

I am excited to share with you a Graphic 45 Box and Mini book I altered using Graphic 45 Tropical Paradise 8 x 8 paper pad.   This Box was created for Scrap-a-Doodle Doo in Ramsey, NJ. 

This is the cover of the box.  Look at all those goodies.  

This is what the inside of the box looks like.  


This is the inside of the box with the Mini book inside. 
 This is one side of the mini book.  With lots of tags and pull tags.

 This is the back side of the Mini Album.  It has even more tags and pull tags.  I hand stamped a bunch of tags to go into the pocket.
 
The above pictures are what the side of the box looks like.

To get the holes in the side of the box.  I marked the spot with a pencil, then used my Big Bite to punch the holes.  Covered the back side up with designer paper so you don't see the holes from the inside.  Loop it over to the button and voila- It closes.

And that is my crinkled ribbon you see on the side of the box.  You can find this ribbon in my Etsy Shop.

Thanks for stopping by today.

Wednesday, August 22, 2012

Captured Moments

Hi Everyone,

Here is another project I created. I love these little books by Amy Tangerine.  I have 3 more at home to alter.  I went to a store in Connecticut and seen just the cutest thing done with this style book.  So I went home and put one together "my way".  :)  What do you think?


 This book is geared towards travel experiences and photo's.  I hand wrote the words "Moments" at the bottom of the book.
 I love this camera paper.  It is just perfect for favorite snapshots.
 There is even spots in the book for little notes.  Tickets and receipts of those special moments.

I love the chevron page.  Isn't it just the cutest?  These are just a few of the pages in the book.  There are a lot more.  Too much to put into a blog post.  
This last page has a journaling page paper clipped to the back page.  You can even add more little tags and things to the last page.  

It's cute right?